

Welcome to the thrilling world of blogging, where your thoughts, ideas, and passions come to life on the digital stage. If you’ve ever considered sharing your expertise, experiences, or creativity with the world, there’s no better time to start than now. And what better platform to kickstart your blogging adventure than WordPress?
In this step-by-step guide, we’ll walk you through the exciting process of creating your own blog using WordPress. Whether you’re a seasoned writer, a budding photographer, or someone eager to dive into the blogosphere, this guide is designed to demystify the process and equip you with the knowledge needed to launch your blog successfully.
From setting up your WordPress account to choosing the perfect theme and crafting compelling content, we’ll cover it all. Get ready to unlock the potential of your unique voice, connect with like-minded individuals, and make your mark in the vast online community.
Let’s embark on this journey together and turn your blogging dreams into a reality!
1. Choose Your Domain Name
The very first thing you will need to do when starting a WordPress blog is to decide what your domain name will be. The name of your business. This is the most important thing. You have to be serious about it. Your domain name should be short 1-3 maximum words long, easy to remember and spell. You can click here to buy a domain name and create a blog, then continue to follow the easy steps below.
I highly suggest Namecheap over GoDaddy. I must recognize that I don’t like GoDaddy as a company as they always have a sneaky way to add things to your card without you purchasing it. Be careful with free trials and unchecked boxes. However when it comes to domain names they are one of the oldest registers so it is safe, just take care of upsells and make sure to uncheck unnecessary boxes before making a purchase, You won’t make any mistakes by choosing whatever you prefer.
Namecheap is a great choice and more affordable. All my domain names are on Namecheap.
2. Buy Hosting Server
I am a very big fan of Hostinger. I tried many other hosting providers and decided that I will host all my sites on Hostinger, because of their uptime and speed, affordability, free SSL, and magnificent live chat support.
Here is what makes it awesome to choose it as your hosting provider.
Hostinger makes it very smooth and easy to create a WordPress blog. I suggest you take a lower plan as a beginner and upgrade once your site starts growing. It is very easy to transition between plans and takes one click to upgrade.
Go for a WordPress Hosting. A type of shared hosting that’s optimized for WordPress websites. If you plan to use WordPress for your small blog, this plan is a perfect choice, starting at $1.99/month.
3. Connect Your Domain And Your Hosting
1. In your Hostinger account, find the nameservers in DNS Zone Editor.
2. Sign in to your Namecheap account.
3. Go to Domain List from the left sidebar and click on the Manage button next to your domain name:
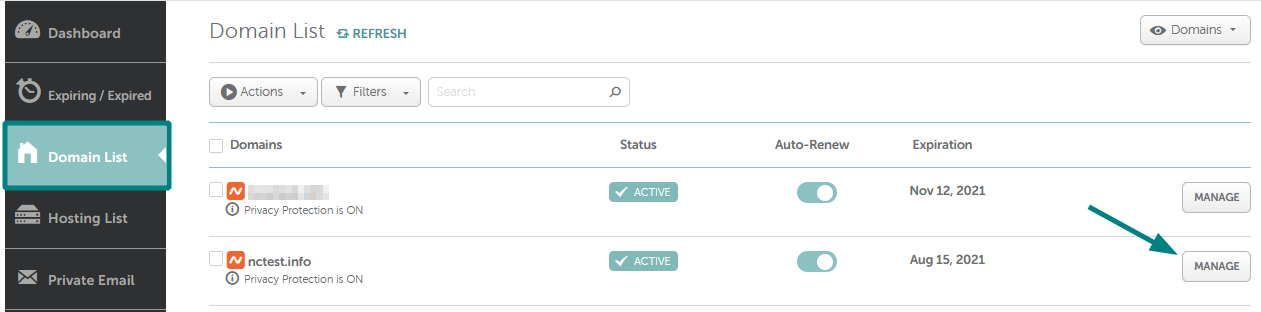
4. Select the Custom DNS option from the drop-down for Nameservers, and enter your Custom nameservers (found in your Hostinger account) into the fields provided.
Once done, make sure you click on the green checkmark to save the changes:
It can take up to 24-48 hours for DNS to fully propagate worldwide.
4. Set up the WordPress
Once you’ve purchased a hosting plan and chosen a domain name, it’s time to decide on the platform that your new blog will run on.
Hostinger is an excellent choice if you’re looking for secure and reliable web hosting at an affordable price. They offer layered protection against DDoS attacks and a 99.9% uptime guarantee. Hosting plans start at $1.39/month.
As we’ve discussed, there are numerous blogging platforms to choose from. For the most well-rounded experience, however, we recommend starting out with WordPress, the self-hosted CMS.
WordPress is one of the best CMSs available and the best platform for a blog. It has numerous blog management tools and features.
Even though WordPress has a steeper learning curve than most website builders, there are many available resources to help users learn how to use it. Once you get the hang of WordPress, its daily management will become much easier.
The first step is to install WordPress on your blog site using the auto-installer provided by your hosting provider through the control panel.
Here’s how to do it on Hostinger’s hPanel:
- Navigate to Website -> Auto Installer.
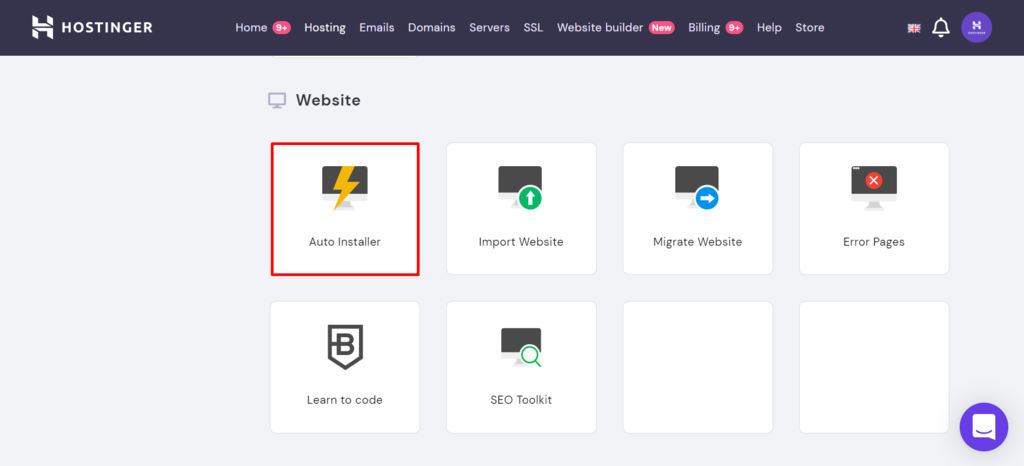
- Under WordPress, click Select.

- A new window will pop up. Fill in the form with the correct details:
- Check whether your domain name is correct.
- Type in the Administrator Username, Password, and Email. This login information will be used to access your WordPress dashboard or admin area.
- Enter your Website Title. The blog name is usually written here. It can be changed later from the Site Identity settings on the WordPress dashboard.
- Choose your preferred Language.
- Select Always update to the latest available version to get the latest features and security patches.
- Select Install.
5.Choose A Theme
It is time to set up your theme now and choose the look of your website. The most important thing you should consider when choosing your theme is loading time (speed) and mobile responsive design. These are among other things google ranking factors.
You can choose some of the free themes available in WordPress. There are many options to choose from. Pick the one you like. To find free themes, you have to be logged in to your WordPress website panel and in the left column click Appearance and then Add New.
Take some time to search and find the one you really like, the one that will fit you, your personality or your business and brand. And don’t worry to much about having to pick the perfect one, you can always go back and pick another one with just a few clicks.
There are also many premium themes for WordPress available that cost little bit of money. They offer professional support and many advanced features. These themes are easily customized with more options. I am using Free Theme from ASTRA and one of their starter templates.
As I said the most important thing to consider when choosing your theme is speed and to be mobile responsive. The fastest themes on a market and the ones I love the most are.
- ASTRA
- Genesis by Studiopress
- GeneratePress
- You can also purchase themes from:
- ThemeIsle WordPress Themes
- Themeforest
6. Install Plugins
Some plugins are necessary but there are many that are not. Please note that plugins can lower your site’s speed and the more plugins you use slower your site will load.
Here are essential WordPress plugins I use for my websites:
Akismet Anti-Spam. Used by millions, Akismet is quite possibly the best way in the world to protect your blog from spam. It keeps your site protected even while you sleep.
Google XML Sitemaps. This plugin improves SEO using sitemaps for best indexation by search engines like Google, Bing, Yahoo and others.
Insert Headers and Footers. Allows you to insert code or text in the header or footer of your WordPress blog
Meks Easy Social Share. Easily display social share buttons for your posts, pages and custom post types. Supports Facebook, Twitter, Reddit, Pinterest, Email, Google+, LinkedIn, StumbleUpon, WhatsApp and vKontakte.
Meks Smart Author Widget. Easily display your author/user profile info inside WordPress widget. Smart feature of this plugin is user/author “auto detection” which means that it can optionally show author of current post on single post templates or on specific author archive.
Meks Smart Social Widget. Easily display more than 100 social icons inside WordPress widget. Choose from different icon shapes and sizes and quickly connect your website with your social profiles. Aim, Apple, Behance, Blogger, Cargo,
WP User Avatar. Use any image from your WordPress Media Library as a custom user avatar. Add your own Default Avatar.
Hope you found this blog post helpful. You can download for free and print my online business checklist below that can help you track your progress. Good luck in building your website!
[mailerlite_form form_id=1]
Erzsebet Frey (Eli Frey) is an ecologist and online entrepreneur with a Master of Science in Ecology from the University of Belgrade. Originally from Serbia, she has lived in Sri Lanka since 2017. Eli has worked internationally in countries like Oman, Brazil, Germany, and Sri Lanka. In 2018, she expanded into SEO and blogging, completing courses from UC Davis and Edinburgh. Besides Litepreneur, Eli has founded multiple websites focused on biology, ecology, environmental science, sustainable and simple living, and outdoor activities. She enjoys creating nature and simple living videos on YouTube and participates in speleology, diving, and hiking.